Saturday, November 30, 2013

Sizzix Tim Holtz 3D Luminary

I have been drooling over this die for a few months now, and I finally got it.

I could not wait to play with it. I usually try out assembled items first to see how they go together, and try to figure out ways to cut the assembly time down, and any other short cuts. Because you know, I'm all about the short cuts and getting the project done quicker. (read....impatient).

I had some white poster board hanging around.....


It came out pretty nice if I do say so myself.  Bland, but nice. A little more sturdy than I thought it would be. I'm not fond of the gaps in the base, and thought maybe if I was a little more careful on the next try I would be able to eliminate them.

I found a CHA video on line with Tim Holtz, where they put the lantern on, what looked like a candle stick, and put a little winter scene on the inside. It was cute, it had a bottle brush tree and a little fawn. Considering the inside working space is a little over 2 inches square, you would have to find some tiny stuff to put in there. A friend of mine does paper quilling, and I think that would look wonderful in there as a Christmas ornament.

A few days went by and I thought I would give it another go. I wanted to make a blue lantern with stars. I thought that would look cute, and I know I have star stamps.......WRONG, no star stamps. :(
I was determined to do silver on blue.

I found in my stamp stash, a few dot and swirl stamps. I like it, looks nice, but ......meh. On the next go around I will embellish it more.

The window part I did with recycled packaging and alcohol inks.
I save the flat part of anything that comes packaged in clear plastic. I LOVE making shaker cards, so I always have a stack of this stuff.

The die was made to hold a battery operated tea light.
I learned a few things, the gaps in the base will always be there. No matter how hard you try or how careful you are to line everything up, there will always be gaps. Thick tacky glue works the best for gluing the eaves to the top. If using StazOn ink, or a thick pigment ink for stamping the cardstock/chipboard before running it through the die you WILL get ink transfer onto the crease pad, I suggest stamping after you cut it. It is a good idea to use a cardstock thickness shim when running the die through the machine, that way you know you are getting a clean cut all the way through the material you are using for the lantern. I didn't do this on the poster board trial run and had to use an exacto to complete the cuts. This is why I do trial runs on scrap.

I have too many ideas for this. And I want to do them all.  

Friday, November 22, 2013

Ideas strike hard and in odd places.

A LONG while ago while at work I was struck with an idea, brought on by a simple energy drink can. 
There is/was an energy drink on the market called Lost.
One of the dispatchers at work would get this energy drink by the case loads from a friend.
The first thing I noticed about the can was the graphics on it.

I ripped the can out of his hand and demanded that he give me ALL of the cans once they were empty. 
I think he gave me MAYBE 5 of them.

I sat with the cans trying to figure out what I could I could make with them that wouldn't slash through the graphics.

I decided on some kind of jewelry piece. I didn't take the idea too seriously, so it wasn't going to spend a lot of money on this project. On the plus side, I had plenty of time to make the project come together.

When it comes to making jewelry I'm pretty much a minimalist. Simple and easy is usually the way I go. It is difficult for me to think too much outside of my comfort zone.
I figured this would be my chance to leave my comfort zone and do something totally "out there".
I wanted to make something that, in my opinion, would be something totally whacked out.
A statement necklace. A HELL of a statement necklace.

The energy drink cans, sitting on my Old Sizzix machine (which I do still use).

I started by cleaning the cans throughly, cutting them open, clean again with rubbing alcohol, and mounting them on "fun foam" that I got from dollar tree. I used 3M spray adhesive. 
I then used Sizzix mini tags die (38-1207). I cut the graphic from the can then positioned it over the tag shape I wanted and ran it through the machine. The fun foam gave it a nice backing and made it so there were no sharp edges to it.
I made a LOT of tags like this.
I "blinged" some out with manicure rhinestones and beads.

I used beads that were given to me, they were from a child's "dress up" play set. I really don't like plastic beads when it comes to making jewelry, so these were sitting around for a while. I decided now was the time to use them up.
I made some drops with them. Actually I made a A LOT of drops with them.
I also figured out the bottoms of the cans were good for holding jumprings and beads while I was working on this project.
I searched my jewelry supply stash and figured I did not have a bulky chain to use a base. But I did have a large bag of jumprings from a grab bag of supplies, so, I guess I will make my own chain.

2+2 links. I think I made it about 19 inches.

Then came the fun of putting it all together. I didn't get pictures of that process because I was in a "zone" when I got started.

The final project was (in my words) obnoxiously loud to say the least.
And of course I HAD to make earrings to match.

Ready for the close up shots?


I e-mailed pictures of it to the company that made the drink, but never heard back from them, they probably thought I was some psycho. But hey, that's ok, I was kinda crazed when the idea hit me so....

I posted pictures of it on the web site Cut Out And Keep. Just for fun. It wasn't long after I posted it that a lady from the Netherlands messaged me asking if I was willing to sell it. My first thought was, "Really??? Someone wants to buy THIS???"

I couldn't in good conscious take money for this....thing. So I traded her for some candy that my Grandmother used to bring back from Holland when I was a child.

From what I understand she wears it for Carnival, because it matches what she wears for the celebration.

Total time for project....about 6 hours.

Friday, November 15, 2013

Recycled jewelry into steampunk brooch.

Finished brooch.

The top Part is a link from a broken cuff Bracelet.
On top of that I cut the ring band off an old blue stone ring.
A broken locket hangs from a gold tone chain.
I layered a clock gear and a old button on top of the locket.
Hanging from the locket is another clock gear and a scrapbook key.

Monday, November 11, 2013

Sunday, November 10, 2013

Some Steampunk Stuff

 
My first time making a Steampunk mask. I chose a Plague Doctor mask because I found the masks cheap when I lived in Tucson. $1.25 for a hard plastic mask. They were Mardi Gras metallic colors.
I covered the mask with leather I got from Freecycle. Freecycle can sometimes be a great place to find free crafting supplies, and you are keeping it from going into the landfills. Bonus...it's FREE.

The "leather" around the goggles is a  faux leather remnant. The larger "rivets" are actually fasteners from Dollar Tree. The lenses came from Dollar Tree sunglasses. The smaller fasteners are scrapbook brads. 
The beak decorations are actually shelf stays that I picked up at Home Depot. I used a metal punch for the screw hole. Since the stay has a hollow tube I coiled brass wire around a knitting needle, and it fit perfectly in the tube.

A friend of mine is now the proud owner of this mask.

The following 4 projects were my first time making anything Steampunk.
 This was a Christmas ornament. The leaves were cut from a soda can mounted on fun foam and colored with alcohol ink.. The globe disc was rescued from a recycling plant in Tucson. A friend noticed them and snagged them for me. I love my friends, they just randomly throw crafting supplies my way.
 Thrift store frame, leather backing random found objects. The gear in the corner is actually etched on the glass and Rub-n-Buff was applied.
 Another thrift store frame, more leather for backing, watch and clock parts, globe discs,  and jewelry filigree.
 Steampunk Top Hat. More clock parts.
 Craft wire, embossed leather remnant, scrapbook eyelets and satin cording.
All 4 projects went to live with a great guy I met a few years back. My second brush with anyone famous. If you have ever seen Discovery Channel's Dirty Jobs, the projects went to live with Dave Barsky.


Thursday, November 7, 2013

My first time published!

I squealed like a little kid. And it was a huge push to do other things.
 Dec./Jan 2011
Page 52.

Sunday, November 3, 2013

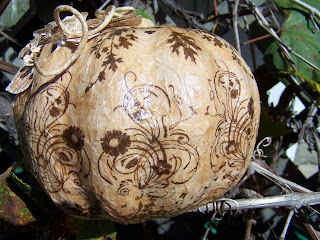
4th Annual Trick Your Pumpkin "Vintage Pumpkin" entry mini tutorial.


This was one of my entries for the 4th Annual Trick Your Pumpkin Contest sponsored by Plaid Enterprises.

I started with a regular Dollar Tree carve-able Pumpkin. 
I gessoed it so there was no orange showing.
I then raided my stamp collection. That alone took about an hour, "OOOh I forgot I had that stamp!"
I went with the StazOn ink because it had a better color and saturation when I stamped with it.
I die cut flowers out of an old vintage book (an OLD shorthand book). I used Spellbinders Bitty Blossoms die and chalk pastels to color them.
Working for Hobby Lobby, I had access to unprinted clothes pattern tissue, (McCall's and Simplicity use it as packing) So the tissue is recycled. You can use white tissue paper but it won't have the vintage look. You can even use old patterns for a totally different look. Hey, look, it's a bottle of Mod Podge. I cannot tell you how long I resisted using Mod Podge, but I DO use it because it has a nice finish to it. I just can't stand the smell of it.
I rubber stamped a few selected images on the tissue with the StazOn ink. I stamped A LOT of images.
I started by decoupaging a few layers of the torn tissue onto the pumpkin, until there was no gesso showing through. I wasn't too concerned about the wrinkles, because I wanted the pumpkin to have texture. 
The reason I stamped so many images was so I could do mirror images. The saturation of the ink onto the tissue is what makes this possible. That way I could a pattern to the pumpkin. I used 4 different stamps. All the stamps are Inkadinkado stamps.
 A clean craft table is a rarity for me!
I made the curly vine by taking Mod Podge soaked tissue and twisting it around wire.
If you have any other questions or comments, feel free to leave them below. 


Thank for stopping by!